


SharpenAir™ is the first hand-held airbrush needle sharpening device on the market. Our patent-pending design has been exclusively manufactured for the airbrushing industry so you will NEVER be stuck without a needle again!
Dimensions and Specifications
- SharpenAir™ measures 3.5" x 3.5"
- Made from high-quality materials for enhanced durability and functionality
- Includes four custom-size diamond grit sharpening stones, 2 600/grit and 2 1200/grit
- Includes SharpenAir™ 3000 grit Polishing Pad
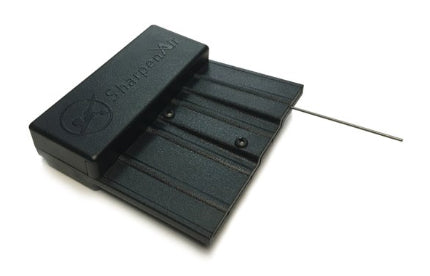
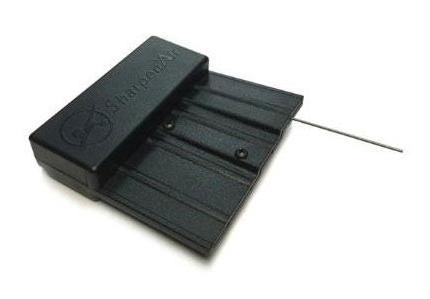
- SharpenAir™ boasts a sleek design with a matte black finish and smooth embossed logo located on the front face. Runners located at the bottom of the tool allow for easy needle insertion and sharpening.
What is SharpenAir™?
SharpenAir™ is a hand-held tool designed to repair bent and damage airbrush fluid needles.
How does it work?
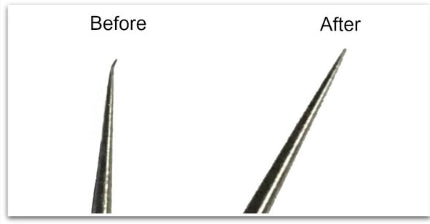
Our design is compact and easy-to-use. SharpenAir™ utilizes multiple angles allowing your damaged needle to be straightened precisely and correctly each and every time while maintaining its factory angle. There are four runners located at the bottom of each SharpenAir™ which are uniquely angled to do the work for you. At the end of each runner is a diamond-grit coated sharpening stone. These stones are made up of varying grit and work together to provide you with a consistently perfect finish.
How long does the sharpening process take?
The process typically takes 1-5 minutes depending on the severity of the bend in your needle.
Is it compatible with multiple needle sizes and brands?
Yes. SharpenAir™ Original was designed to work as a universal tool. It is compatible with most fluid needle sizes and brands. However, we have a Large model that accommodates the DeVilbiss Dagr and Paasche due to needle shaft thickness. Through research we've discovered that most needles, no matter the size, were ground at the same angle. The difference in needle sizes is attributed to the length of the cone rather than the angle at which it is made. SharpenAir™ controls the angle while it sharpens allowing you to efficiently and effortlessly correct bent needles to their factory finish.
Will it affect the factory angle of my airbrush needle?
No. You can be confident that SharpenAir™ will give you a precise factory angle with every use.
How can SharpenAir™ save me money?
By using our tool you will dramatically cut costs by not having to pay for pricey needle replacements; we give you the ability to extend the life of your airbrush needles. SharpenAir™ will not only save you money, but will save you time as well. Keeping your projects on schedule is an important part of keeping customers happy. Our tool delivers when you need it most.
What is the life-span of SharpenAir™?
Our product is made with high-quality materials to enhance durability and function. The design also allows users to get the most use out of every component. Each sharpening stone can be manipulated and re-seated to use the maximum amount of surface area. We also sell replacement stones on our website.
You may also find our video helpful. It is a demonstration of the SharpenAir™ in action. Please feel free to contact us with any other questions or concerns you may have. Thanks!
Basic Instructions for using your SharpenAir™
Although the SharpenAir™ is quick and easy to use it is helpful to read our instructions before your first use to ensure proper sharpening of your airbrush fluid needle. We also have a tutorial video that may be useful to you.
SharpenAir™ contains four sharpening stones in its main compartment area where the logo is embossed. There are four runners which run from the base of the sharpener vertically to the end of the sharpener.
Begin by holding the SharpenAir™ in your left hand, logo side up. Reference graphic below once reading the steps.
Step 1Place the needle in the slot allowing the needle to reach the end of the runner. With minimal pressure begin rotating the needle in a clockwise direction; about 10-15 revolutions. Pull the needle out and check the tip. You may need to repeat this step a few times to achieve the desired straightness and/or until the burr is removed.
Step 2This runner is at less of an angle than Step 1 and uses a less aggressive stone. Using the same amount of revolutions as step 1 (10-15), this step eases the angle even further in order to reach stock angle. This process will also help in removing some of the step one sand scratches.
Step 3and Step 4 are designed utilizing the same angle. Step 3 contains a sanding stone consisting of a lower grit to quickly reshape the entire cone if needed. This step is optional. Smaller repairs may be completed at Step 2, however, a more damaged needle may utilize all steps in order to be completely sharpened.
Step 4 contains a higher grit sharpening stone and will further sand out the scratches from Step 3.
If you have any further questions on how to operate your SharpenAir™ please feel free to contact us and we will be happy to help!